


 |

|

|

|
|
 |
 |
|||
The Installation and Moving Over of a Face Belt Conveyor
Training Manual No. 1Chapter III
MOVING THE CONVEYOR INTO A NEW TRACK
 1. Make sure that the new track is clear of debris and that the supports are set in line so that the conveyor can be laid perfectly straight.
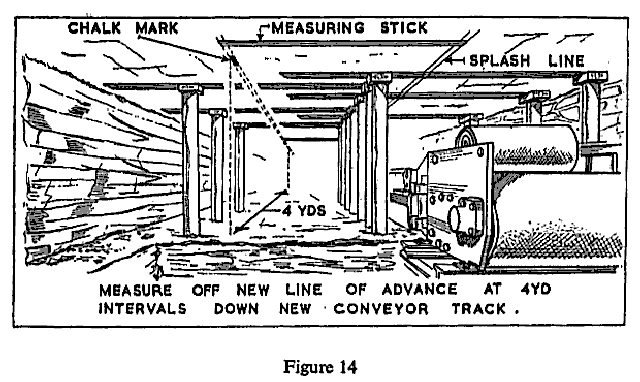
2. Mark a new conveyor line on the roof at a distance equal to the depth of cut from the last line. Use a measuring rod to mark the line by dots at about 4-yard intervals (Figure 14).
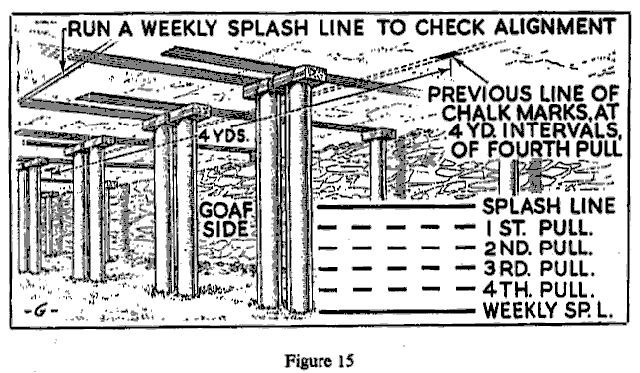
Every week the dotted line should be checked by a continuous line put on as described in Chapter II, paragraph 2 (Figures 5 and 15).
3. Run the empty belt until the short 12-yard lengths are round the engine end and tension end.
4. Slacken the belt by taking off the sylvesters at the tension end and removing the stays at the engine end.
5. Remove the flexible cable/air hose from the engine end. Hang the cable/hose in a clean dry place.
6. Uncouple the top belt at the engine end, replacing the coupling pins through one set of fasteners to prevent loss.
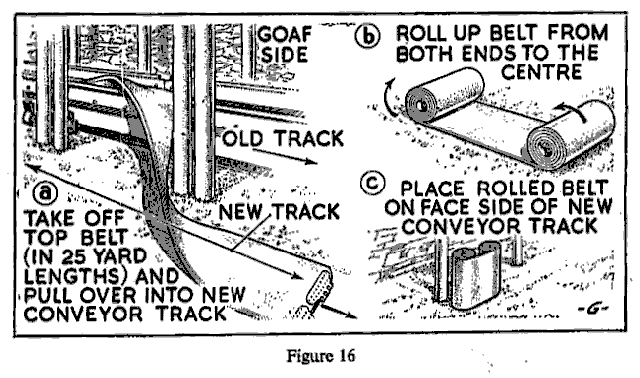
7. Remove the top belt from the structure [Figure 16(a)], and either lay out as the bottom belt in the new track or roll up in lengths from each end to centre [Figure 16(b)]. Place the rolled-up belt against the face [Figure 16(c)].
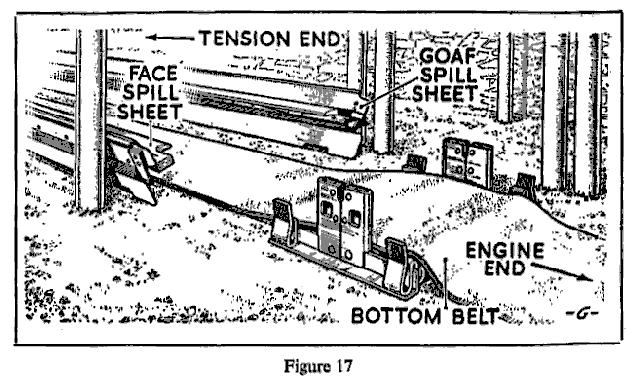
8. Remove the intermediate sections, starting from the engine end, and place with spill plates against goaf row of props of new track (Figure 17).
9. Uncouple bottom belt at engine end.
10. Remove bottom belt and lay out in new track.
11. Prepare new position for engine end.
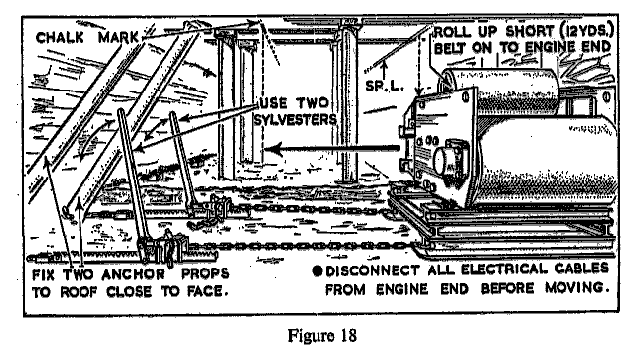
12. Roll up the short 12-yard length of belt on to the engine end, and move the engine end into its new position using sylvesters (Figure 18).
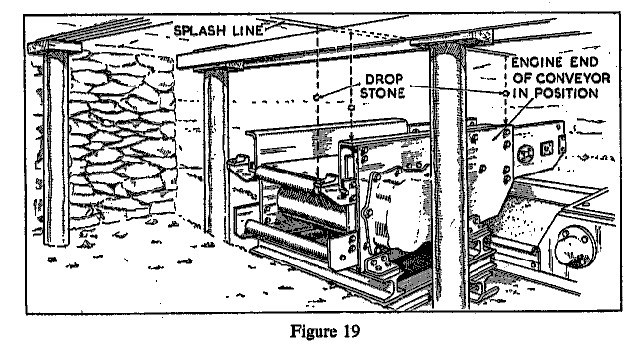
13. Bring the face side of the engine end directly under the line on the roof, making sure that the driving drums are level and that the delivery point is in correct position for loading either into tubs or on to the gate conveyor (Figure 19).
Note: (a) No inflammable material must be used as packing pieces.
(b) A jack may be used to assist the final positioning of the tension end.
14. Couple the bottom belt of the short piece that is threaded round the engine end to the bottom belt already laid out in new track.
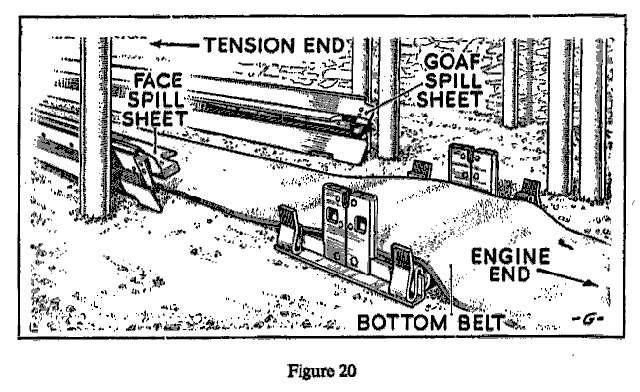
15. Move over the stools or standards into the new track and place them under the bottom belt, in similar positions to those they were in in the old track (Figure 20).
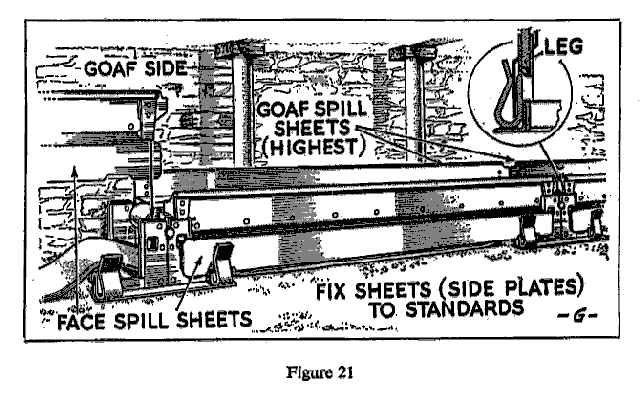
16. Build the intermediate structure on the stools (Figure 21).
17. Check alignment by dropping a stone or plumb bob from the line on the roof to the edge of the conveyor (Figure 22).
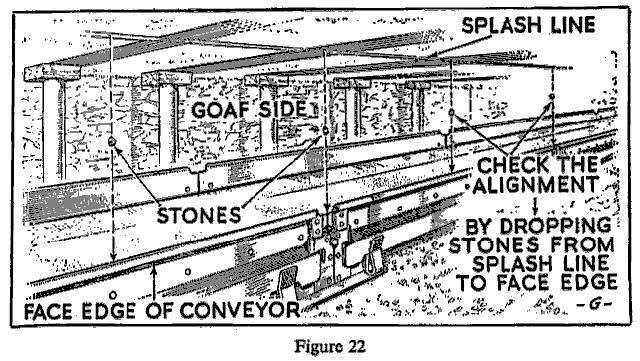
18. Roll out on top of the intermediate structure the lengths of belting stacked against the face, and connect to the top portion of the short piece threaded round the engine end.
19. Prepare the position for the tension end in the new track.
20. Roll up the short 12-yard length of belting on to the tension end and move the tension end into the new position. Leave enough room behind the tension end for tensioning the belt.
21. Bring the face side of the tension end directly under the line on the roof (Figure 23).
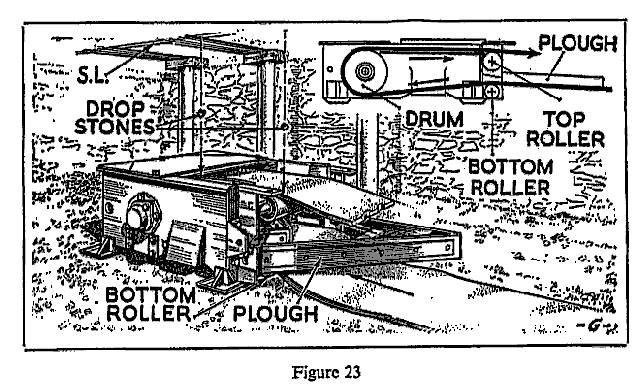
22. Connect the bottom belt which is laid out in the new track to the bottom belt of the short piece around the tension end.
23. Connect up the intermediate structure to the tension end where a telescopic pan is used (otherwise leave the tension end uncoupled until the belt has been tensioned).
24. Couple the top belt, as laid out on the intermediate structure, to the top portion of the short piece round the tension end.
25. Stay down the engine end by placing stays from the engine to the roof (Figure 24).
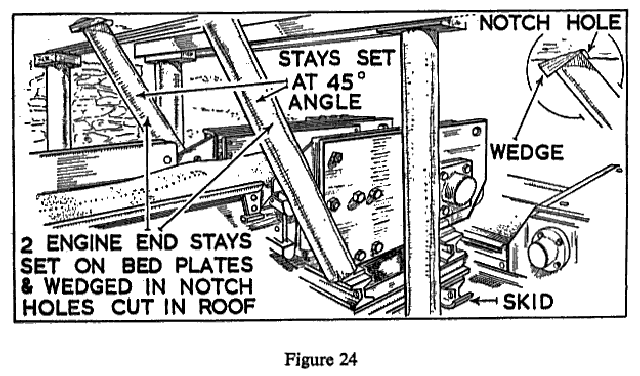
26. Fix sylvesters to anchor props at tension end (Figure 25).
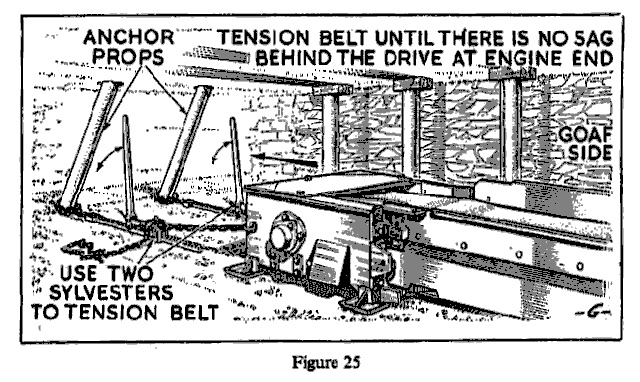
27. Tension the belt.
28. Attach the flexible cable/air hose to the motor, making sure that it is clean and dry.
With electric machines see that the isolator switch on the gate end box and the motor switch are in the "off" position before the cable plugs are inserted into the sockets.
29. Make sure the belt runs properly on the driving and tension drums and that it remains central and rides on all the intermediate rollers. Proceed as follows
| (a) |
Place men within hearing distances of each other at the engine end, tension end and at suitable intermediate positions.
| |
| (b) |
Switch on the power.
| |
| (c) |
While the belt is running, apply more tension at the tension end until there is no sag behind the drive at the engine end. If the belt runs to one side on the return drum pull on the sylvester at the same side: this will make the belt run centrally.
| |
| (d) |
Centralize the belt on the driving drum by aligning the drive head afresh and resetting the stay props. During these adjustments the belt must be stopped, otherwise the engine end might spin round.
| |
| (e) |
With the belt running, check that it runs centrally along its whole length, and that it rides on all the rollers when running empty. Where it does not, the stools or standards should be packed up from the floor.
| |
| (f) |
All stools or standards should be set so that they do not rock.
| |
| (g) |
All rollers should rotate freely. Those that do not should be replaced.
|
GENERAL OBSERVATIONS ON THE SEQUENCE OF OPERATIONS
The sequence in which the operations are carried out will depend upon the conditions at the face. For instance, if the coal cutting is done on the same shift as the conveyor moving, and is starting at the tension end of the face, it may be necessary to start moving over the conveyor at the tension end in order that this work may keep ahead of the coal cutter. Similarly when ripping is in progress in the main gate it may not be possible to move the gear head at once and in this case also a start on conveyor moving would be made at the tension end.
Where the intermediate structure is moved into the new track before the gear head, it will be necessary to insert a telescopic section about four section lengths away from the gear head. This will make it possible for the gear head to be placed in the correct position, after being moved forward into new track, for delivering the coal into the tub or gate conveyor.
Where there is a team of men to move over the conveyor, several of the operations may take place at the same time. For example, the engine and tension ends may be moved over at the same time by different members of the team.





 Contains public sector information licensed under the

