


Mail: Webmaster

|

|

|

|
|
 |
 |
|||
Chapter IV
The Withdrawal of Roadway Supports
 A person who is withdrawing supports must make sure that he is working in a safe place and he should use a safety appliance as described in Chapter III.
An anchor prop for the safety appliance must in all cases be specially set for the purpose. The appliance must not be attached to any support with the intention of using it as an anchor prop.
The Withdrawal of Supports set to the Face of the Ripping
| Tools required: | |
| Hammer. | |
| Pick. | |
| Spanner. | |
| Sylvester. | |
1. Examine the ripping lip for breaks.
2. Release the wood packing from behind the uprights of the 'L' bars. Care should be taken to remove any loose stones so as to avoid accidents.
3. Remove the wedges between the 'L' bars and the caunch or ripping lip girder.
4. Draw out the straps using a sylvester where necessary.
The Withdrawal of Supports set under the Ripping
| Tools required: | |
| Hammer. | |
| Sylvester. | |
| Long handle pick or pout. | |
| Prop twister. | |
1. Examine the roof under the ripping. If necessary, make the area safe and set temporary supports.
2. Set up an anchor prop at the face opposite one of the gateside packs.
3. Attach a sylvester and chain between the foot of the anchor prop and the top of the prop to be withdrawn (Figure 28). A specially designed prop twister may be attached to the top of the prop and to the chain to assist the work of removing the prop. Attach a spare chain to the next prop to be removed.
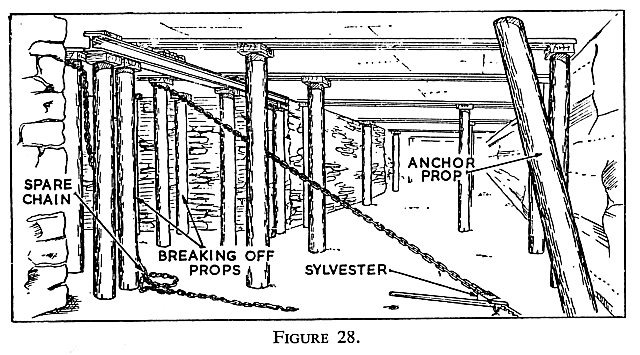
4. Operate the sylvester lever and withdraw the prop. A longhandled pick or pout should be used to reach any prop or bar in the area from which the props and bars are being removed.
5. Remove all the props and bars required with the exception of the girder set directly under the ripping.
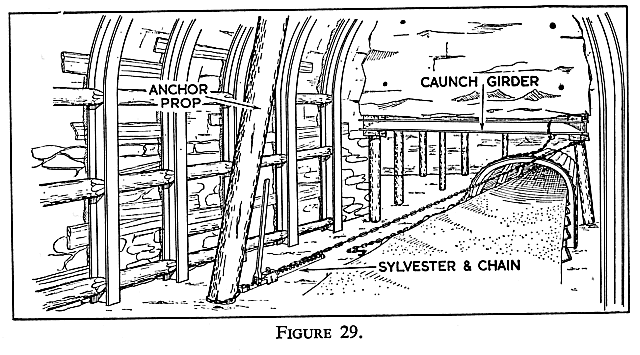
6. Set up an anchor prop in the roadway. Using a sylvester, remove the props set under the caunch girder (Figure 29).
| Note: |
Never pass under a ripping caunch after the supports have been removed. Use a long-handled pick or pout to remove any props that may fall in the area that is now unsupported.
|
The Withdrawal of Roadway Girders
A. ARCHED GIRDERS
| Tools required: | |
| Sylvester or monkey winch. | |
| Hammer. | |
| Pick. | |
| Spanner. | |
| Shovel. | |
1. Examine the roof in the area from which the arch is to be withdrawn.
2. Set temporary props to secure the roof whilst the work of removing the arch is carried on.
3. Remove the arch girder as follows:—
| (a) |
From an old roadway:
|
| (i) |
Erect a platform or a scaffold if the height of the roadway is such that the fishplate bolts cannot be reached easily from the floor.
|
|
| (ii) |
Using a spanner, remove one bolt from the fishplates, and insert a long bolt in its place. The purpose of the long bolt is to prevent the fishplates suddenly flying apart when the bolts are removed. This may occur when the plates are under stress, and may cause injury to the workmen. Where the plates are secured by two bolts only, clamps specially designed for the above purpose should be used.
|
|
| (iii) |
Slacken the remaining fishplate bolts and then tap the plates with a hammer until they are loose. Remove the bolts and store the plates safely.
|
|
| (iv) |
Remove the platform or scaffold.
|
|
| (v) |
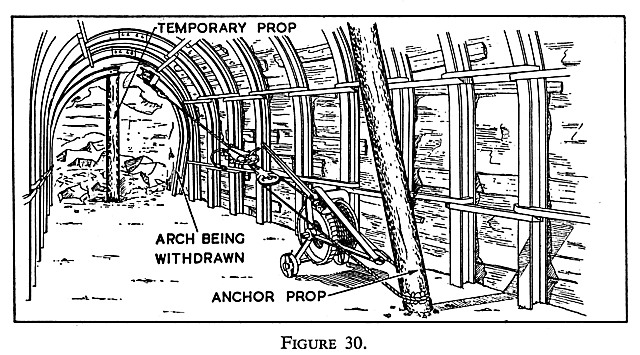
Remove the arch, using a sylvester and chain or a monkey winch (Figure 30).
|
| Note: |
If the sections are pinned together at the top, pull them apart with a sylvester. Where the foot of the arch has penetrated deeply into the floor, the floor may have to be removed, but where a winch is used, the method shown in Figure 26 inset should be adopted.
|
| (vi) |
Remove the temporary props using the withdrawal device.
|
| (a) |
From roadways being re-ripped:
|
| (i) |
Secure the arches ahead of the re-ripping by setting centre legs under them. This will prevent them reeling towards the ripping.
|
|
| (ii) |
Erect a platform or scaffold where necessary.
|
|
| (iii) |
Remove the rocks from above the arch to the new roadway dimensions. Secure the roof by temporary props or from forepoling girders.
|
|
| (iv) |
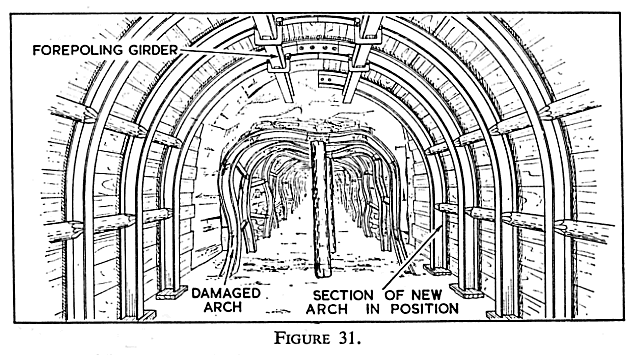
Erect the new roadway supports as shown in Figure 31.
|
|
| (v) |
Secure the roof and sides behind the new arch and then remove the damaged arch.
|
B. STRAIGHT GIRDERS
| Tools required: | |
| Sylvester or monkey winch. | |
| Hammer. | |
| Pick. | |
| Shovel. | |
1. Examine the roof in the area from which the girder is to be removed.
2. Set temporary props to secure the roof whilst the work of removing the girder is carried on.
3. Remove the girder as follows:—
| (a) |
From an old roadway:
|
| (i) |
Erect a platform or scaffold where necessary.
|
| Note: |
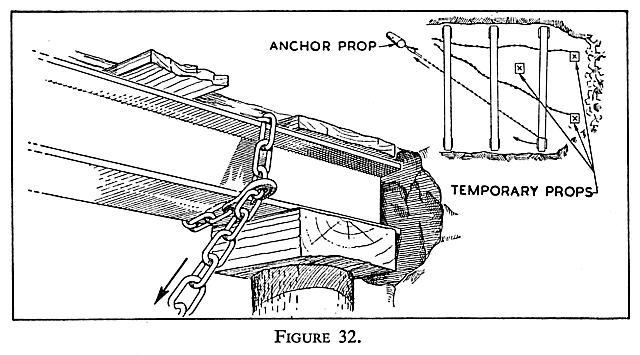
A girder may have become 'endbound'; (i.e. the ends of the girder have become squeezed tightly between the sides of the roadway). The girder must be freed by picking away the stone from behind the end of the girder (Figure 32).
|
| (ii) |
Attach the sylvester chain or the pulling rope of the winch close to one end of the girder. Attach a spare chain to one of the temporary props.
|
|
| (iii) |
Operate the withdrawal device and pull the girder free.
|
|
| (iv) |
Remove the props that were supporting the girder.
|
|
| (iv) |
Remove the temporary props.
|
| (b) |
From roadways which are being re-ripped:
|
| (i) |
Secure the girders ahead of the ripping by jack props. This will prevent them reeling towards the ripping.
|
|
| (ii) |
Erect a platform or scaffold where necessary.
|
|
| (ii) |
Remove some of the rocks over the girder.
|
|
| (iv) |
Support the roof with forepoling girders or by temporary props.
|
|
| (v) |
Using a sylvester or a monkey winch, remove the girder when a sufficient amount of debris has been removed from over it.
|
|
| (vi) |
Remove the rocks to the dimensions of the new roadway. Place new supports in position and secure the roof and sides.
|
| Note: |
When a damaged girder has to be replaced, set two new girders, one on each side of it, tightly to the roof before removing the bent girder.
|
C. CAMBERED GIRDERS
Cambered girders not supported by props may be removed directly by using a withdrawal device.


 |
 |
 |
||

Back |

Home |
Copyright © 1999-2012 by The Durham Mining Museum and its contributors
Page last updated: 01 Jan 2008 |

Search |

|