


Mail: Webmaster

|

|

|

|
|
 |
 |
|||
Chapter IV
Repair of Broken Belts
Broken Top Belt
 1. Release the belt (at the loop take-up or tension end).
2. Locate the break.
3. Pull the broken ends into a convenient position for mending.
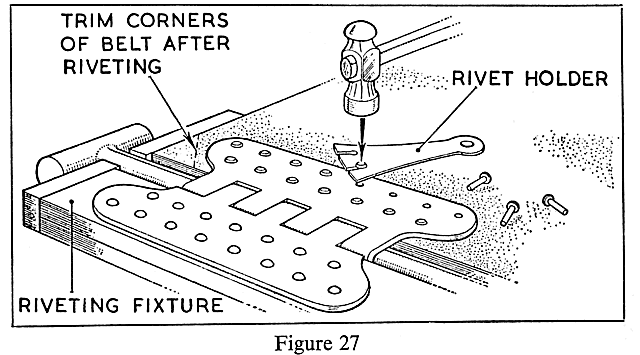
4. Square and cut the belt edges, removing any rotten piece near the joints. The duck exposed should be clean and not discoloured. Attach the fasteners, making sure when using plate hinges that the two halves will mate (Figure 27).
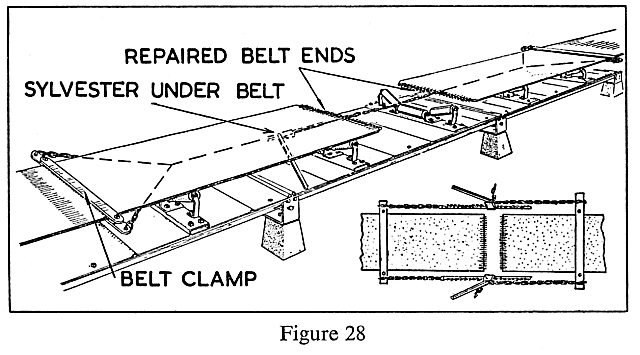
5. Attach clamps on each side of the completed belt ends about 3 yards from each end.
6. Attach the sylvester(s) between the two clamps.
7. Operate the sylvester(s) and draw the ends of the belt together (Figure 28).
| Note: |
Where Bristol couplings are used for joint making, the ends have to be pulled together before the joint can be made.
|
8. Interlace the fasteners and insert the coupling pin. Cut ¾" off each corner of the belt.
9. Remove the sylvester(s) and clamps.
10. Tension the belt by the ratchet device at the loop take-up or by the sylvesters attached to the return drum structure.
| Note: |
In some circumstances it may be found to be easier and quicker, where a spare piece of belting is available, to uncouple the belt at the nearest joint at each side of the break, remove the broken pieces from the structure and replace with the spare piece.
|
Broken Bottom Belt
1. Release the belt.
2. Locate the break and pull the broken ends into a convenient position for mending.
| Note: |
Where it is necessary to remove the intermediate structure to get to the broken belt, uncouple the top belt and roll it back on each side of the break. Remove the intermediate structure, square and attach fasteners to the broken ends of the belt and draw the ends together using sylvester(s) and clamps. Replace the intermediate structure, roll back the top belt, draw the ends together and couple up. Re-tension the belt.
|
Broken Belt in the Drive
1. Release the belt.
2. Draw the broken ends clear of the structure.
3. Square and attach the fasteners to the ends, making sure they will mate correctly.
4. Draw one of the newly made ends round the driving drums — a length of soft wire (or a piece of old belting tapered to a long narrow tongue) attached to the end of the belting will assist the threading.
5. Couple the ends together.
| Note: |
If there is no loop take-up or insufficient spare belting on the loop take-up to allow for this, it is advisable to uncouple the belt on top of the jib head structure. The newly made end attached to the other end of this now uncoupled length of belting is threaded round the driving drums and loop take-up drum and coupled to the other newly made end attached to the bottom belt. The two ends on top of the jib head structure should then be drawn together by sylvester(s) and clamps and coupled.
|
6. Replace any fencing that has been removed.
7. Re-tension the belt.
Broken Belt in the Tension End
1. Release the belt.
2. Remove the top belt from the tension end.
3. Remove the telescopic pan and draw out the bottom belt from the tension end.
4. Square and attach fasteners to each of the broken ends, ensuring they will mate.
5. Uncouple the top belt at the nearest joint.
6. Thread this uncoupled length round the return drum, using a length of soft wire to assist in the work, making sure that the belt passes over the roller and under the plough where one is attached.
7. Couple one end to the newly made joint on the bottom belt and lay out the other end on top of the return drum structure.
8. Replace the telescopic sections.
9. Draw the two ends of the belt on top of the structure together by sylvester(s) and clamps and couple them together.
10. Re-tension the belt.
11. Centralise the belt on the return drum.


 |
 |
 |
||

Back |

Home |
Copyright © 1999-2012 by The Durham Mining Museum and its contributors
Page last updated: 01 Jan 2008 |

Search |

|