

Mail: Webmaster

|

|

|

|
|
 |
 |
|||
Chapter III
The Withdrawl of Face Supports
 All the supports except the packs are withdrawn at the waste edge as the face is advanced. If they are not damaged they can be reset near the face.
The withdrawal of supports is an operation which perhaps more than any other demands care, good judgment and sound mining experience in order that it may be carried out with safety.
When the supports are withdrawn the roof in the waste usually collapses. A row of strong supports should be set to form the new waste edge before props are withdrawn. It forms a good breaking off line and prevents the collapse of the roof in the waste extending into the working area. These supports consist of chocks or strong props.
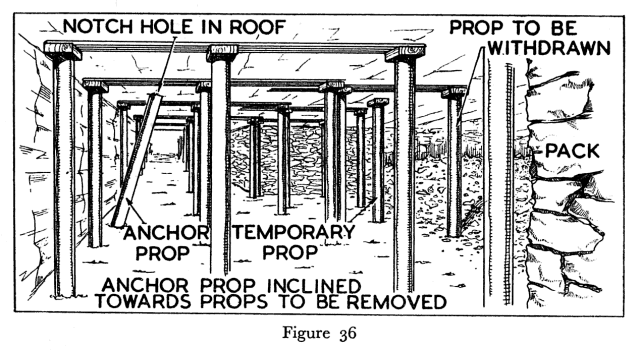
Temporary props should be set to secure the roof while the supports are being withdrawn (Figure 36). They help to prevent accidents from sudden roof collapse.
The person who is withdrawing supports must also make sure that he is working in a safe place, and he should use a safety appliance such as a Sylvester prop withdrawer.
The Sylvester Prop Withdrawer
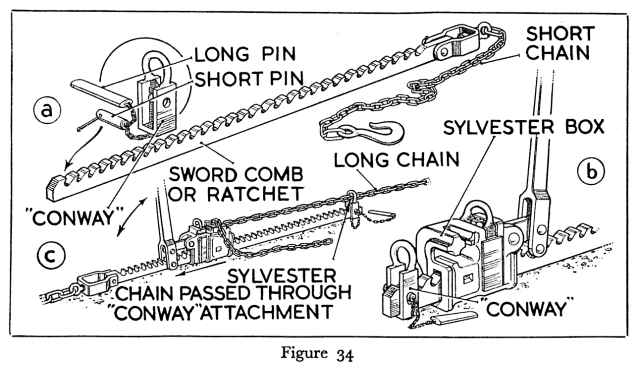
The Sylvester consists of the following parts:—
1. A sword or ratchet to which is attached a short chain for fastening round the anchor prop.
2. A Sylvester box and operating lever.
3. A loose chain (about 15 feet in length) for attaching to the support to be withdrawn.
The sword fits through the Sylvester box as shown in Figure 34.
Inside the Sylvester box is a pawl which is pressed on to the ratchet by the spring. When the operating lever is pulled, the box slides along the ratchet. The paw] engages in the teeth of the ratchet and prevents the box slipping back when the operating lever is released (Figure 35).
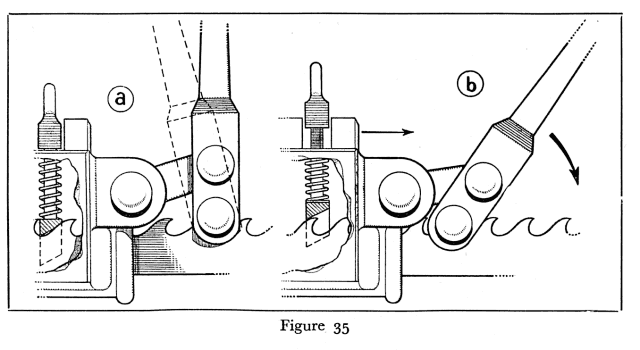
To slacken off a Sylvester pull the lever until all the tension is off the pawl. Lift the pawl above the teeth of the ratchet and slowly release the lever. Allow the pawl to slide into the next groove and take the tension again.
Repeat until the chain is slack.
Note: When using a Sylvester never stand between the lever and the object being pulled because the lever may fly over and cause injury if its movement is not properly controlled.
Always keep the Sylvester, especially the box, clean, and make sure that the chain is in good condition.
How to Withdraw a Prop and Lid
| Tools required :— | |
| Sylvester | |
| Hammer (long handled and about 5 to 7 lbs in weight) | |
| Pick | |
1. Set an anchor prop as shown in Figure 36 inclined towards the prop to be withdrawn, and with the head inserted into a notch made in the roof.
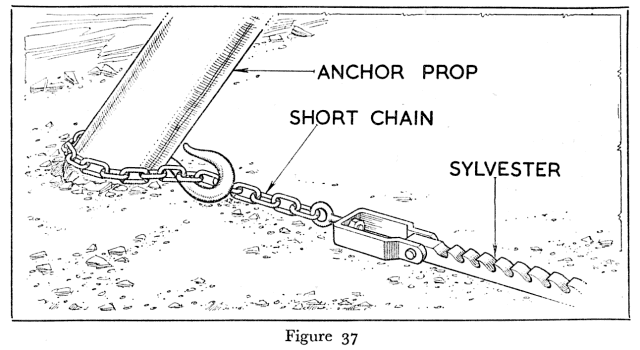
2. Pass the short chain which is attached to the sword of the Sylvester round the foot of the anchor prop so that the hook passes under the chain as in Figure 37.
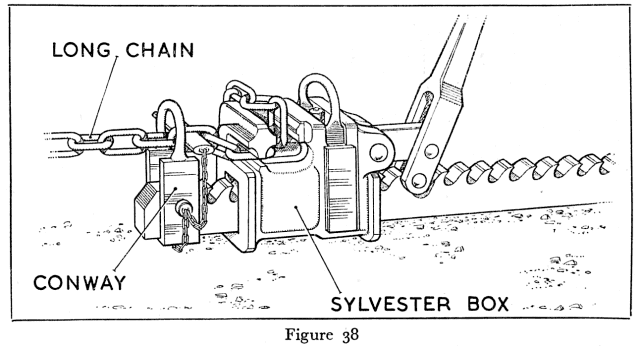
3. Pass the hook end of the long chain round the top of the prop that is to be withdrawn. Loop the chain through the hook, pull the chain tight, and place a link in the eye of the Sylvester box as shown in Figure 38.
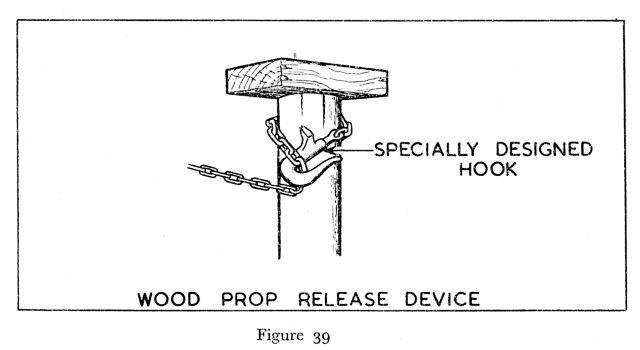
Note: Props are more easily withdrawn if a slight twist is given to them when they are being pulled. The chain should, therefore, be secured to the prop so as to impart this twisting motion. Where wood props are being withdrawn a specially shaped hook may be used to facilitate this twisting motion (Figure 39).
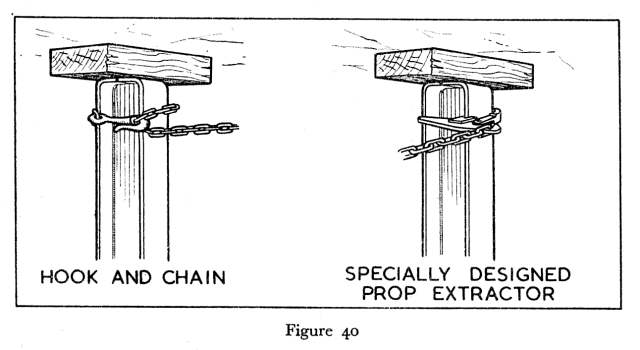
Where steel props are being withdrawn the hook of the chain is placed into the flange or a hole at the top of the prop so as to impart the twisting motion. Specially designed devices can be used to grip a steel prop and give better leverage in imparting the twist (Figure 40).
4. Operate the Sylvester until the prop is released.
5. Pull the released prop from beneath the unsupported roof either by means of the Sylvester chain, or by means of a long bandied pick.
How to Withdraw Props and Bars
The details of the operation of withdrawing props and bars are the same as those of the operation of withdrawing a prop and lid, except that it is necessary to withdraw first that prop which is furthest from the face (Figure 41).
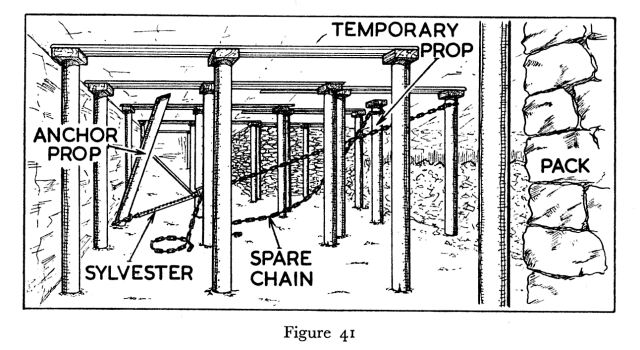
Before any particular prop is pulled attach a spare chain to the one that will have to be withdrawn next as shown in Figure 41 so that it will be unnecessary to go under unsupported roof to do this.
IMPORTANT POINTS
1. Temporary props should be set to ensure the safety of persons during prop withdrawal.
2. No prop must be withdrawn without the use of a safety appliance such as the Sylvester prop withdrawer.
3. Anchor props must in all cases be specially set for the purpose. The Sylvester must not be attached to any of the face supports with the intention of using them as anchor props.
4. Anchor props must be set in a supported area such as the cutter track so that the operator can perform his work from a safe position.
5. The anchor prop should be inclined at the top towards the prop that is being withdrawn.
6. No person should work under an area of roof that is unsupported.
7. The long chain between the Sylvester and the prop to be withdrawn should be clear of the conveyor, so that it will not damage the equipment when it is being pulled.
Dismantling a Chock into which a Chock Release Device has been built
| Tools required :— | |
| Long handled hammer | |
| Long handled Pick or Pout. | |
1. Test the roof round the chock and set a temporary prop.
2. Stand in a safe place and, using the long handled hammer, strike the rear release trips (Figure 42).
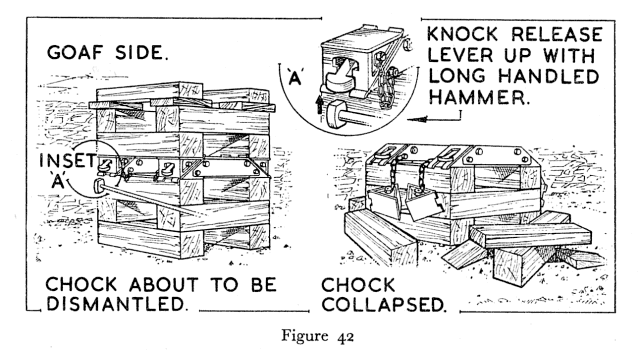
3. In the same way release the trips on the face side.
4. This will release the chock, the pieces of which should then be gathered together and stored ready for future use. Use the long handled pick or pout to recover the chock pieces from the unsupported area.


 |
 |
 |
||

Back |

Home |
Copyright © 1999-2012 by The Durham Mining Museum and its contributors
Page last updated: 01 Jan 2008 |

Search |

|